• Horn Player – Computer Dude – Gig Pig …
  • Home
  • About
  • Blog
  • Services
  • Contact
  • Webmail
  • Terms

Robert A. Owen - Musician - Technology Leader

Music, Technology, Rants and Funnies - Randomness at its best!

  • Blog
  • Internet
    • IIS 6
    • IIS 7.5
    • Javascript
    • Web Design
      • WordPress
      • Coldfusion
  • Support
    • MicroSoft
      • Powershell
      • Surface
      • Windows10
      • Zune
    • PC-Care
    • Software
    • Virus
      • Email Scam
    • Vista Quest
    • Windows 7
  • Pictures
    • Instagram
  • Music
  • Friday Funnies
  • General
    • CoWorking
    • Gadgets
    • Politico
    • Random – TidBit
    • Rant
    • Review
    • Site of the Week
    • Useless
    • Xbox
      • Games
You are here: Home / Support / MicroSoft / Add Additional Domain to Exchange 2003 SBS

Add Additional Domain to Exchange 2003 SBS

August 26, 2009 By Robert Owen

I had to add a new e-mail domain for a client to their existing 2003 Small Business server.  Without removing the existing mail domain and without going into each user here are the steps I went through to add the new mail domain.

First, open the Exchange System Manager.  You can find it by clicking: start button —> All Programs —>Microsoft Exchange —> System Manager
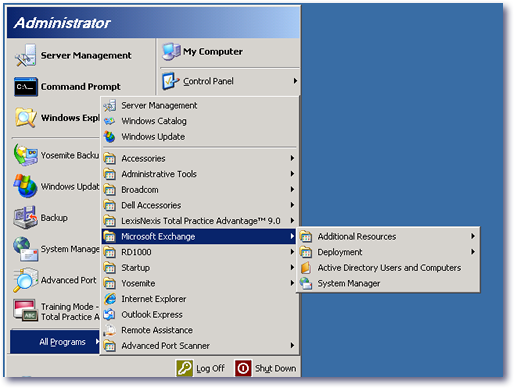
add-domain1

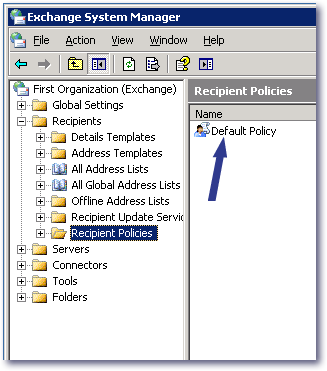
Once you have the System Manager Open you will need to drill down to  “Recipient Policies” under Recipients.  When you click on “Recipient Policies” you should see “Default Policy” on the right.  Double click on the “Default Policy”
add-domain2

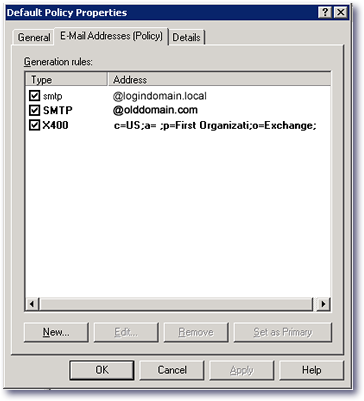
After clicking on the “Default Policy” it’s properties window should open.  In that window you will see three “Tabs” (General, E-mail Addresses (Policy) and, Details)  Click the E-mail Addresses (Policy) tab.  There you will see the current list of domains.  To add your new Domain, click the “New” button at the bottom of the window.

add-domain3a

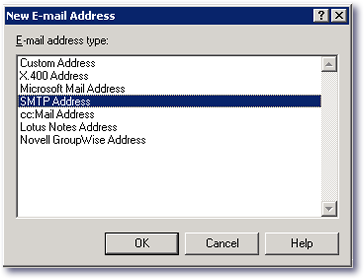
After you click “New” another window will open showing a list of options.  Selecte “SMTP” from the list and click “OK”.
add-domain4

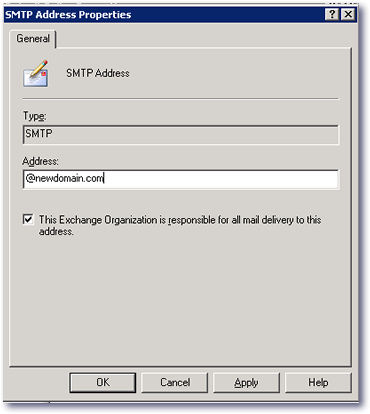
In the next window you will type your new domain.  Make sure and include the  “@”  infront of the name.  Also, make sure the box is checked beside “This Exchange Organiztion is resposible for all mail delivery to this address.”  Click “OK” to continue.
add-domain5

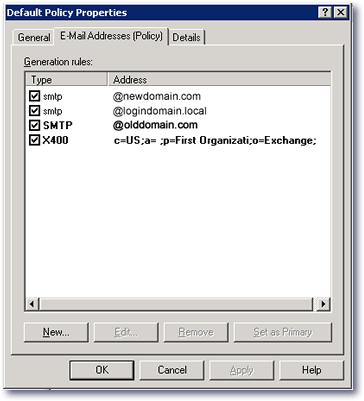
Now you will be returned to the domain window.  You should now see your new domain in the list but it will not have a check beside it.  Check the box to the left of the domain name to enable it.  Once you do this you will get a “Pop-Up” message saying:
“The e-mail Addresses of type(s) [smtp] have been modified.
Do you want to update all corresponfig recipient e-mail addresses to match these new address(es)?
“

Click  “Yes”. now your domain window should look something like this:
add-domain3

Now, if you have set-up the DNS correctly, you will be able to receive mail on this domain to all existing mail boxes.

© 2009, Robert Owen. All rights reserved.

Related posts:

Default ThumbnailWindows 7 Telnet Client Default ThumbnailMicrosoft Zune Update Default ThumbnailError – A problem on your computer is preventing updates from being downloaded Default ThumbnailComplete PC Back-up: Pretty dang cool!

Filed Under: MicroSoft Tagged With: Click, Domain, Domain Name, Domain Window, Double Click, E Mail Addresses, Exchange System, Infront, mail, Mail Address, Mail Boxes, Mail Client, Mail Delivery, Mail Domain, Manager Open, Manager Once, Manager.  You, Microsoft Exchange, New Button, New E Mail, New Mail, Organiztion, Policy, Sbs, Small Business Server, Smtp, Start Button, Tabs, window

Robert Owen A Horn Player turned salesman, turned Computer Consultant & Horn Player, Turn Network Engineer & Horn Player, Now Technology leader & Musician.... Well, How about a Horn player who does a lot of other stuff? More about me. FacebookInstagramLinkedInTwitter

To Stay up-to-date on all of my crazy Ramblings, enter your e-mail address below.

You'll be amazed!

Recent Posts…

  • What If? – Gig Edition
  • Feedback – two way street
  • Snow-pocalypse… and Cold
  • Snow-pocalypse 2025 – part 6
  • Snow-pocalypse 2025 – part 5

Recent Comments

  • David Gray on Create a Shortcut to open in your Alternate BrowserTwelve years on, this tip remains useful. Though I…
  • Sue K on Use the Snipping Tool to Capture MenusThanks you so much! I could never figure out how t…
  • aa on Increase IIS File Upload LimitsSuperb Robert..after wasting 2 days..this is perfe…
  • León on Windows 7 error 86Funciono para Windows 7 , también descubrí que la…
  • Nicole Larkin on Use the Snipping Tool to Capture MenusNine years later and your post is still helpful. T…

[footer_backtotop]
Content Copyright © 2025 OWEN CONSULTING · All Rights Reserved · Log in