• Horn Player – Computer Dude – Gig Pig …
  • Home
  • About
  • Blog
  • Services
  • Contact
  • Webmail
  • Terms

Robert A. Owen - Musician - Technology Leader

Music, Technology, Rants and Funnies - Randomness at its best!

  • Blog
  • Internet
    • IIS 6
    • IIS 7.5
    • Javascript
    • Web Design
      • WordPress
      • Coldfusion
  • Support
    • MicroSoft
      • Powershell
      • Surface
      • Windows10
      • Zune
    • PC-Care
    • Software
    • Virus
      • Email Scam
    • Vista Quest
    • Windows 7
  • Pictures
    • Instagram
  • Music
  • Friday Funnies
  • General
    • CoWorking
    • Gadgets
    • Politico
    • Random – TidBit
    • Rant
    • Review
    • Site of the Week
    • Useless
    • Xbox
      • Games
You are here: Home / Internet / IIS 7.5 / Increase IIS File Upload Limits

Increase IIS File Upload Limits

April 8, 2014 By Robert Owen

I recently ran into an issue where IIS was returning a 404.13 error when users were trying to upload files.  I did a bit of looking and found that files uploaded fine when they were lower than 30MB.  But once we tried to upload anything larger, IIS would return the 404.

With a bit of digging we found that there is a  maxAllowedContentLength setting in IIS 7.5. Who knew? Well, I guess I should have.  In IIS 7.5, the default limit for this setting is 28.6 MB.    At any rate, here is how you can change this setting.  Note: The maxAllowedContentLength specifies the maximum length of content in a request, in bytes.

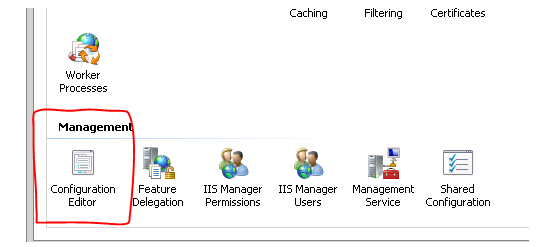
To change this, open IIS Admin, click on the server and then double click “Configuration Editor”

IIS-Uplimit1

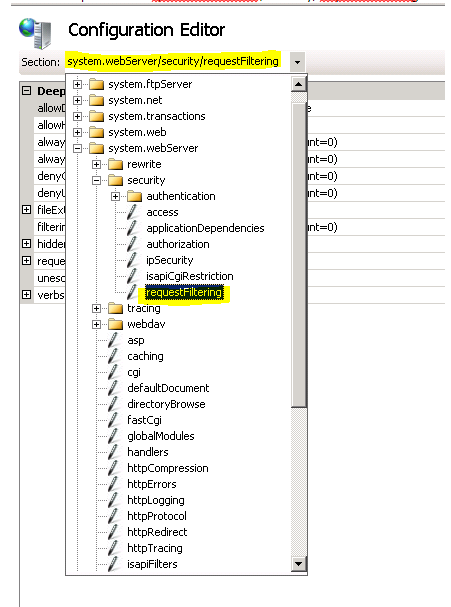
 Once that opens select system.webServer/security/requestfiletering from the dropdown at the top of the window.

IIS-Uplimit2
Expand “requestLimits” and edit the maxAllowedContentLength setting to the desired level.  Default is 30000000 bytes, Roughly 28 MB. Change the setting to your desired amount.  IIS 7.5 has a max size of 2GB.  (2147483648 bytes)
IIS-Uplimit3

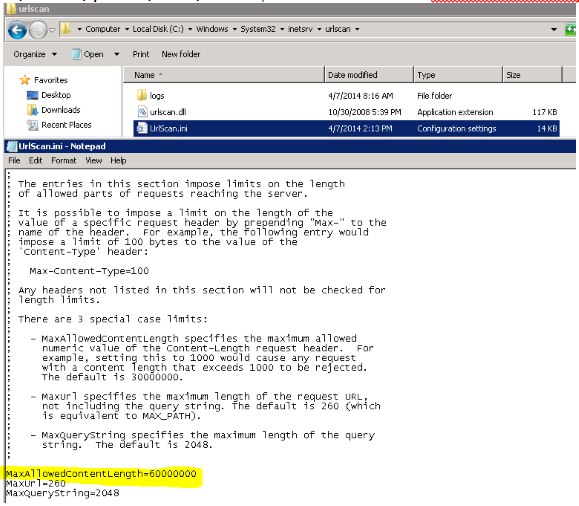
 Next, if you have URLScan installed on the server, the MaxAllowedContentLength setting will need to be changed there as well.  To edit the UrlScan.ini file, navigate to:

 C:\Windows\System32\inetsrv\urlscan – open the UrlScan.ini and find MaxAllowedContentLength and set the limit to match your new setting in IIS.

IIS-Uplimit4

Finally,  to apply the setting changes perform and IISRESET.

© 2014, Robert Owen. All rights reserved.

Related Posts Plugin for WordPress, Blogger...

Filed Under: IIS 7.5, Internet, MicroSoft, Support

Robert Owen A Horn Player turned salesman, turned Computer Consultant & Horn Player, Turn Network Engineer & Horn Player.... Well, How about a Horn player who does a lot of other stuff? More about me. FacebookInstagramLinkedInTwitter

To Stay up-to-date on all of my crazy Ramblings, enter your e-mail address below.

You'll be amazed!

Recent Posts…

  • Instagram Photos
  • Time for more Pictures
  • Windows 10 – Forget Wireless Network
  • Powershell to check and start a service
  • Its Amazing – Shia LaBeouf

Recent Comments

  • David Gray on Create a Shortcut to open in your Alternate BrowserTwelve years on, this tip remains useful. Though I…
  • Sue K on Use the Snipping Tool to Capture MenusThanks you so much! I could never figure out how t…
  • aa on Increase IIS File Upload LimitsSuperb Robert..after wasting 2 days..this is perfe…
  • León on Windows 7 error 86Funciono para Windows 7 , también descubrí que la…
  • Nicole Larkin on Use the Snipping Tool to Capture MenusNine years later and your post is still helpful. T…

[footer_backtotop]

Content Copyright © 2023 OWEN CONSULTING · All Rights Reserved · Log in