Create a Shortcut to open in your Alternate Browser
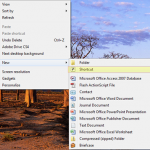
June 19, 2010 by Robert Owen  
Filed under Internet, MicroSoft, Windows 7

Here’s a quick and simple “How To” for you.  I had this question posed by a client the other day and it made me think.    This Client is a fan of FireFox.  It is his default browser and tries his best to NEVER use Internet Explorer.  But, as is the case with most things, the more you try to keep from using something that’s right when you find out you have to.

This was the case here.  He had a vendor’s website that would only work in IE AND he needed to use this website alot so, he had a shortcut on his desktop to get to it.  The problem is the Internet Shortcut will open in his Default Browser… Firefox.  Now,  since he uses IE so infrequently, you would think – just make the website in question the home page  and be done with it.  But that won’t help if you have more than one shortcut.

So, here we go.

  • First, right-click on your desktop and select New —> Shortcut
  • This will open a new Window.  Here you need to click “Browse” and Navigate to the folder containing the executable for the browser you are wanting to use.
  • After selecting the executable you need to add your URL to the end. Make sure and put the URL outside the quotes surrounding the executable and make sure and put a space between the closing quote and the URL.
  • Next, just give your new shortcut a creative name and click finish.

Now you have a URL Shortcut that will open in your non-default browser.

This doesn’t have to be just for Internet Explorer…  This will work for any browser you want used for this particular shortcut.  Firefox,  Chrome, Opera… whatever.


Possibly Related Posts:


Tell the Masses:
  • Digg
  • Twitter
  • del.icio.us
  • FriendFeed
  • Facebook
  • email
  • Print
  • Google Bookmarks
  • Technorati
  • Live
  • LinkedIn
  • StumbleUpon

Warranty Schmarranty

January 7, 2010 by Robert Owen  
Filed under Apple, Internet, Rant

Here’s an interesting read about Apple’s wonderful customer service. Note my sarcasm?  :-)

Anyway, here’s a short clip of the article.

The Apple Retail Store Hates You  -

I recently visited the Apple store to exchange a defective power adapter which was still under warranty.  I still have the defective adapter, as it has now cost more time and effort than it was originally worth.

What I have lost is time, money, and trust in the ethics of the retail store.  What I have gained is disdain for their tactics and a sick feeling every time I hear “Apple Store.”

Why don’t I just dump my MacBook Pro and go with a PC?  Because my employer uses Mac-based programs and hardware and I don’t see my building replacing 300+ machines any time soon.  Whether “fanboy” or “hater,” my use of Apple products for work will change very little.  However, my personal purchase plans have already changed and I hope others might be spared some of the inconvienience and inepttude I experienced in my last visit:

Short version:

Rather than complete a simple warranty exchange, they want me to make an appointment to drive back to the store to exchange a defective power adapter that is well within the one-year warranty.  Seriously.  They actually wanted to put me on “Standby” and expected me to hang around for 2-3 hours in case a “genius”

Head on over to TardySlip.net to read the entire article.

Possibly Related Posts:


Tell the Masses:
  • Digg
  • Twitter
  • del.icio.us
  • FriendFeed
  • Facebook
  • email
  • Print
  • Google Bookmarks
  • Technorati
  • Live
  • LinkedIn
  • StumbleUpon

Google Wave Invites

December 4, 2009 by Robert Owen  
Filed under Internet, Support

Google Wave InvitesHello peoples !! Want an Invite to Google Wave?  Well, as It so happens, I have a few to pass out. I’ve still not figured out how I am going to make use of this new service but, I log in from time to time and give it a go.  When I logged into my Google Wave account today I  found that I have 15 more invites to give away!  Hurray!?!?  Now, some of you may be asking: “What is Google Wave?” Well, who better to answer that than Google themselves:

Google Wave is a new online communication and collaboration tool that makes real-time interactions more seamless — in one place, you can communicate and collaborate using richly formatted text, photos, videos, maps, and more.

A wave is a conversation with multiple participants — participants are people added to a wave to discuss and collaborate on its content. Participants can reply any time and anywhere within a wave, and they can edit content and add more participants as a wave develops. It’s also possible to rewind waves with the playback functionality, to see what happened, and when.

Does that sound interesting to you?  Want and invite?  To get one of these ditties, take a moment  read another article on this site… Any one will work, a Friday Funny, a Rant, a support article,  anything that strikes your fancy.  Then tweet about that post, post a link to your tweet in the comments below this post and once I verify the tweet  I’ll add you to the invites list.

wave-invites

That’s it…

Possibly Related Posts:


Tell the Masses:
  • Digg
  • Twitter
  • del.icio.us
  • FriendFeed
  • Facebook
  • email
  • Print
  • Google Bookmarks
  • Technorati
  • Live
  • LinkedIn
  • StumbleUpon

Remove Words from Firefox Custom Dictionary

August 25, 2009 by Robert Owen  
Filed under Internet, Support

Ever type a word you know to be correct yet Firefox says is misspelled?  Say something like snigglefritz…  Thinking there could be numerous spellings for snigglefritz,  I know that mine is the correct one.  What I really hate is Firefox telling me it’s wrong every time I type it.

dictionary

One way to get around that is to add your spelling to Firefox’s Custom Dictionary.  To do that right-click on the misspelled word and select “Add to Custom Dictionary” from the context menu.

dictionary2But, what if you made a mistake?  (I did today… that’s what prompted this “How-To”) What if you find that your spelling was incorrect?  Now Firefox is going to tell you that it’s correct every time you type “snigglefritz”.  You can’t have that, can you?    So, How do you remove your custom word?

Pretty easily actually.

Don’t get real excited.  There is no, “right-click” and remove for this.  You’ll have to edit a file.  Don’t worry, here is what you have to do.

The location of this dictionary file varies by Operating System.

For Windows 7 and Windows Vista, the file is located:
C:\users\[your username]\AppData\Roaming\Mozilla\Firefox\Profiles\[unique-alphanumeric-string].default\persdict.dat

For Windows XP, the file is located:
C:\Documents and Settings\[your username]\ApplicationData\Mozilla\Firefox\Profiles\[unique-alphanumeric-string].default\persdict.dat

Once you find the  file, open it with a text editor.  The file is simply a list of the words that you have added to the dictionary.  Now find your misspelled word and delete it.   There you go!  You have fixed your custom dictionary.  You can actually use this method to add words to your custom dictionary as well.  Just open the file and add as many words as you like.

Possibly Related Posts:


Tell the Masses:
  • Digg
  • Twitter
  • del.icio.us
  • FriendFeed
  • Facebook
  • email
  • Print
  • Google Bookmarks
  • Technorati
  • Live
  • LinkedIn
  • StumbleUpon

Set-up an FTP Server on Windows 2003 Server

August 19, 2009 by Robert Owen  
Filed under IIS 6, Internet, MicroSoft, Support, Web Design

Setting up an FTP server on Windows 2003 Server is a pretty simple process.  Why would you need an FTP server?  Well, if you are hosting websites you might want to allow designers and customers access to their webfolders  (not me… no one accesses my server but me but you can.. :-) ) and an FTP server is a great way to allow them access.  OR some Commercial Copiers have a scan to FTP or SMB service so, you could install an FTP server to allow a central place to save scanned documents.  Needless to say there are many reasons why you might need one and with Server 2003 it’s “Easy Cheesy”.

The Microsoft FTP server depends on the Microsoft Internet Information Services (IIS),  so  IIS and the FTP Service must be installed on the computer.   To install IIS and the FTP Service, follow these steps:

These instructions can also be found at Microsoft’s Support site.

NOTE: In Windows Server 2003, the FTP Service is not installed by default when you install IIS.   If you already installed IIS on the computer, you must use the Add or Remove Programs tool in Control Panel to install the FTP Service.

  1. Click Start, point to Control Panel, and then click Add or Remove Programs.
  2. Click Add/Remove Windows Components.
  3. In the Components list, click Application Server, click Internet Information Services (IIS) (but do not select or clear the check box), and then click Details.
  4. Click to select the following check boxes (if they are not already selected):
    Common Files
    File Transfer Protocol (FTP) Service
    Internet Information Services Manager
  5. Click to select the check boxes next to any other IIS-related service or subcomponent that you want to install, and then click OK.
  6. Click Next.
  7. When you are prompted, insert the Windows Server 2003 CD-ROM into the computer’s CD-ROM or DVD-ROM drive or provide a path to the location of the files, and then click OK.
  8. Click Finish.

You have now installed the IIS and FTP services but before you can start using your new FTP you must configure it. To configure the FTP Service follow these steps.

To configure the FTP Service to allow only anonymous connections:

  1. Start Internet Information Services Manager or open the IIS snap-in.
  2. Expand Server_name, where Server_name is the name of the server.
  3. Expand FTP Sites
  4. Right-click Default FTP Site, and then click Properties.
  5. Click the Security Accounts tab.
  6. Click to select the Allow Anonymous Connections check box (if it is not already selected), and then click to select the Allow only anonymous connections check box.  When you click to select the Allow only anonymous connections check box, you configure the FTP Service to allow only anonymous connections. Users cannot log on by using user names and passwords.
  7. Click the Home Directory tab.
  8. Click to select the Read and Log visits check boxes (if they are not already selected), and then click to clear the Write check box (if it is not already cleared).
  9. Click OK.
  10. Quit Internet Information Services Manager or close the IIS snap-in.

The FTP server is now configured to accept incoming FTP requests. Copy or move the files that you want to make available to the FTP publishing folder for access.  The default folder is drive:\Inetpub\Ftproot, where drive is the drive on which IIS is installed.

Anonymous access only is not a good way to leave your newly installed FTP server if your intent was to give users the ability to upload files and not merely to download.  So, in the next couple of days we’ll go over setting up virtual FTP sites and assign usernames and passwords to access each as well as giving those users read and write access to their folders.

Possibly Related Posts:


Tell the Masses:
  • Digg
  • Twitter
  • del.icio.us
  • FriendFeed
  • Facebook
  • email
  • Print
  • Google Bookmarks
  • Technorati
  • Live
  • LinkedIn
  • StumbleUpon

IIS 6: Adding Footers to Web Pages

July 16, 2009 by Robert Owen  
Filed under IIS 6, MicroSoft

Computer DudeDid you know you can configure the Microsoft IIS 6 web server to automatically insert an HTML-formatted file to the bottom of every web page sent out by your Web Server?  Well, you can.

For example, you host several sites and want to add a link back to your company for advertisement.  You could create a simple HTML file that contained a text message and an image that you hyperlink back to your web site.  Then enable the footer function in IIS 6.

Once you enable this feature, IIS automatically appends the footer file to the designated Web page or file each time the Web page or file is accessed.  *Note the following info from Microsoft:

Document footers can reduce Web server performance, especially if a Web page is frequently accessed.

A footer file should be not be a complete HTML document.  It should contain only those HTML tags necessary for formatting the appearance of footer content.  For example, a footer file that adds your organization’s name to the bottom of every page should consist of text and the HTML tags necessary for formatting the font and color.

To enable this feature of IIS 6, you will need to be a member of the Administrators group on the local computer. (As well as have Console or Remote Desktop access)

Once logged onto the desktop follow these steps:

  1. Create an HTML file containing your footer informtion and save it your server’s hard drive.
  2. In IIS Manager, expand the local computer, expand the Web Sites folder, right-click a Web site, directory, or file, and click Properties.
  3. Click the Documents tab, and select the Enable document footer check box.
  4. In the box below Enable document footer, type either the full local path to the footer file or click Browse to navigate to it.
  5. Click OK.

Possibly Related Posts:


Tell the Masses:
  • Digg
  • Twitter
  • del.icio.us
  • FriendFeed
  • Facebook
  • email
  • Print
  • Google Bookmarks
  • Technorati
  • Live
  • LinkedIn
  • StumbleUpon

Export Dreamweaver CS4 Site Info

July 7, 2009 by Robert Owen  
Filed under Web Design

Ninety-nine percent of the time I work on websites for myself and others from the comfort of my home office. I can kick back relax and generally get a lot of work done.  Sometimes, however, I need a “Change of local”… The office gets a little confining.  Instead of copying the site (or sites) I’m working on from desktop to thumb-drive to laptop, I have devised another method.

This may not be the “best” method but, it works quite well for me. (Thank you very much :-) )

Live Mesh
First, I make use of a free Program/Utility from Microsoft called Live Mesh.  This utility lets me keep files and folders synchronized  between computers regardless of where they are located. I set up my working directory to be synchronized to my storage space in the Live Mesh and my Laptop.  Second, I use the “Export” command in Dreamweaver to copy my sites settings to an XML file. I save those files in a folder that is also synchronized to my laptop. Then I just import them back in when I am working on the laptop.  (I would recommend that you export your site settings regularly so that you have a backup copy if anything happens to the site.)

How do you export the site information in Dreamweaver CS4??  It’s super simple! Here’s what you do:

  1. Open Dreamweaver CS4.
  2. Select Site —> Manage sites.
  3. Select one or more sites whose settings you want to export and click Export:
    *  To select more than one site, Control-click (Windows) or Command-click (Macintosh) each site.
    *  To select a range of sites, Shift-click the first and last site in the range.
  4. If you want to back up your site settings, select the first option in the Exporting Site dialog box and click OK. Dreamweaver saves remote server login information, such as the user name and password, as well as local path information.
  5. If you want to share your settings with other users, select the second option in the Exporting Site dialog box and click OK. (Dreamweaver does not save information that would not work for other users, such as your remote server login information and local paths.)
  6. For each site whose settings you want to export, browse to a location where you want to save the site and click Save. (Dreamweaver saves each site’s settings as an XML file, with an .ste file extension.)
  7. Click Done.

See? Super Easy! Now all you have to do is import them back into your other installation of Dreamweaver.  Here’s how you import it all back into the program:

  1. Open Dreamweaver CS4.Dreamweaver
  2. Select Site —> Manage sites.
  3. Click Import.
  4. Browse to the folder where you saved the exported sites and select one or more sites. Remember, these sites are saved within files with an .ste file extension.
    *  To select more than one site, Control-click (Windows) or Command-click (Macintosh) each .ste file.
    *  To select a range of sites, Shift-click the first and last file in the range.
  5. Click Open and then click Done.
  6. After Dreamweaver imports the site settings, the site names appear in the Manage Sites dialog box.

Possibly Related Posts:


Tell the Masses:
  • Digg
  • Twitter
  • del.icio.us
  • FriendFeed
  • Facebook
  • email
  • Print
  • Google Bookmarks
  • Technorati
  • Live
  • LinkedIn
  • StumbleUpon

Next Page »