
Long time, no type. :-) Like most things on this site, the information is here because I keep forgetting how to do something. I upgraded everything to Windows 10 and think its really pretty good. But, that's a conversation for another post. The reason for this post is the AT&T line coming into my house was struck by lightning a couple of weeks ago. As a result my router and a few switches were fried. So, I to make the dreaded support call and get a technician to come out and … [Read more...]
Powershell to check and start a service
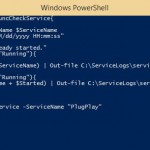
Ok, this one is not funny. My posts are few and far between these days and they are mostly limited to pictures or something I find funny. But, I was going through one of my Onenote files tonight and ran across this powershell script I wrote a while back and thought I would share. When I put this script together, I was having issues with Collabnet Subversion on one of my servers. For some reason, the Collabnet Service was stopping each night and nothing was being logged anywhere to give me … [Read more...]
Increase IIS File Upload Limits

I recently ran into an issue where IIS was returning a 404.13 error when users were trying to upload files. I did a bit of looking and found that files uploaded fine when they were lower than 30MB. But once we tried to upload anything larger, IIS would return the 404. With a bit of digging we found that there is a maxAllowedContentLength setting in IIS 7.5. Who knew? Well, I guess I should have. In IIS 7.5, the default limit for this setting is 28.6 MB. At any rate, here is how you can … [Read more...]
Which CF Instance and jvm config am I using?

This is more of a quick reminder for myself. Hopefully someone else will find it useful as well... If you have multiple instances of ColdFusion running on a server and one of those starts to runaway with the processor you just need to kill it and move on, right? But, what if you what to know which instance it was? If you don't have something like FusionReactor watching your CF Instances then a quick way to determine which instance is the trouble maker is to see the config file being used … [Read more...]
Windows 8 wireless Management

Back when I was setting up my Surface pro, I was trying to quickly move some of my wireless connections to the tablet. There aren't a lot of them but since I didn't remember their passwords, why not just export them or at least view them from my laptop and copy the settings? Well, the laptop that I was going to take the settings from is Windows 8 also so I thought, this should be super easy, there are some handy ways to do this in windows 7. Since this is windows 8, those should have been … [Read more...]
Yes!! Surface Pro for Me! :-)
Ok. After much complaining and whining, I finally got my Surface Pro. My purchase plan had to update a little, but everything seemed to work out nicely. I had planned to get the whole package from Best Buy but, if you read my previous crazy rant. You know that didn't work out. I ended up watching the Microsoft Store website like a hawk and on Feb 16th, they showed up as available for order again with a projected delivery of March 1. Click! Went my order. But, just for the tablet. I … [Read more...]
No Surface Pro for me :-(

I've been looking at getting a Microsoft Surface and was on the fence until they announced that there was a 128GB Pro version that was capable of running full desktop applications. When I saw that, I had to have it! I've been waiting and watching for the release date of February 9th to come around. This device in all it's glory would only be available from 3 locations; The Microsoft store, Staples and, Best Buy. None of these retailers offered the ability of pre-order so, I just had to … [Read more...]