Windows 7 Telnet Client
December 7, 2009 by Robert Owen
Filed under MicroSoft, Windows 7
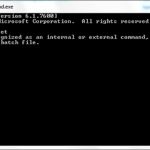
I dropped to a command prompt today on my Windows 7 machine to telnet into my Cisco Router and found, that once Again the Microsoft telnet client is not installed.

It seems that, as with Windows vista, the Microsoft Telnet client is not installed by default. But luckily it’s pretty easy to install, just follow these simple steps:
- Click the Start “Pearl” and select the Control Panel from the menu.

- Once the Control Panel opens, double click the Programs and Features applet.

- A new window will open. Select “Turn Windows Features on or off” from the left menu.

- Again, a new window will open. Check the box beside “Telnet Client” … Also, if you want to enable your “Telnet Server” or “TFTP Client” you can select them at this time also. Click Ok after you have finished your selections.

- Windows will not prompt you that it is installing the components.

After if completes you will be able to make use of the Windows Telnet client.

Enjoy!
Possibly Related Posts:
- Create a Shortcut to open in your Alternate Browser
- My Latest Upgrade
- Windows 7 error 86
- Windows 7 Clean Install from Upgrade
- Use the Snipping Tool to Capture Menus
IIS 6: Adding Footers to Web Pages
July 16, 2009 by Robert Owen
Filed under IIS 6, MicroSoft
Did you know you can configure the Microsoft IIS 6 web server to automatically insert an HTML-formatted file to the bottom of every web page sent out by your Web Server? Well, you can.
For example, you host several sites and want to add a link back to your company for advertisement. You could create a simple HTML file that contained a text message and an image that you hyperlink back to your web site. Then enable the footer function in IIS 6.
Once you enable this feature, IIS automatically appends the footer file to the designated Web page or file each time the Web page or file is accessed. *Note the following info from Microsoft:
Document footers can reduce Web server performance, especially if a Web page is frequently accessed.
A footer file should be not be a complete HTML document. It should contain only those HTML tags necessary for formatting the appearance of footer content. For example, a footer file that adds your organization’s name to the bottom of every page should consist of text and the HTML tags necessary for formatting the font and color.
To enable this feature of IIS 6, you will need to be a member of the Administrators group on the local computer. (As well as have Console or Remote Desktop access)
Once logged onto the desktop follow these steps:
- Create an HTML file containing your footer informtion and save it your server’s hard drive.
- In IIS Manager, expand the local computer, expand the Web Sites folder, right-click a Web site, directory, or file, and click Properties.
- Click the Documents tab, and select the Enable document footer check box.
- In the box below Enable document footer, type either the full local path to the footer file or click Browse to navigate to it.
- Click OK.
Possibly Related Posts:
- Create a Shortcut to open in your Alternate Browser
- My Latest Upgrade
- Windows 7 Telnet Client
- Windows 7 error 86
- Windows 7 Clean Install from Upgrade
Win_root System32 Hal.dll missing or corrupt
July 11, 2009 by Robert Owen
Filed under MicroSoft, Support
Had a dandy today. A client called saying that their computer would no longer boot. When I asked them if there was any kind of error message, they read me the following:
Win_root\System32\Hal.dll missing or corrupt:
Please re-install a copy of the above file.
Sounds serious, huh? It is. When I arrived at the office there was an ominous “clicking” sound coming from the hard drive area of the computer. (cue scary music) And we all know what that generally means. Being optimistic, I decided to attempt the fixes outlined by Microsoft. Here are a couple of ways they offer to attack this issue:
- Start the computer by using your Windows XP CD-ROM. Press any key to boot from the CD.
- After the setup files are finished loading press R to repair using “Recovery Console.”
- In the recovery console, select the installation to log on to (usually number 1), then press ENTER.
- Login to the Administrator account by typing the password for this account, then press ENTER.
- At the recovery console command prompt, type the following command, then press ENTER:
expand <cd-drive>:\i386\hal.dl_ <hd-drive>:\Windows\system32\hal.dll
- Note: In this command, the <cd-drive> placeholder represents the drive letter of your CD drive, and the <hd-drive> placeholder represents the drive letter of the hard disk on which windows is installed.
- If you receive a prompt to overwrite the file, press Y.
- Type exit, and press ENTER at the command prompt.
OR
- Start the computer by using your Windows XP CD-ROM. Press any key to boot from the CD.
- After the setup files are finished loading press R to repair using Recovery Console.
- In the recovery console, select the installation to log on to (usually number 1), then press ENTER.
- Login to the Administrator account by typing the password for this account, then press ENTER.
- At the recovery console command prompt, type the following command, then press ENTER:
CHKDSK /r
Note: You do not have to include the /p switch in the Chkdsk command-line because the /r switch causes the Chkdsk utility to locate bad sectors and recover readable information. This command implies the /p switch.
Neither of those methods worked for me, as this user’s hard drive was actually failing and getting worse on each attempt to fix it. (But, barring any failing hardware, I think the above fixes would work just fine.)
In terms of speed, trying to replace the file is the quickest option for fixing this error as it should only take you a couple of minutes. Should you want to try fixing with check disk, that option will take a bit longer. If you have the time to wait, I might suggest the “check disk” option, as there are probably some other files that have gotten “corrupted” and this should fix them as well.
Possibly Related Posts:
- Create a Shortcut to open in your Alternate Browser
- My Latest Upgrade
- Scammers: They really need to try something new
- Warranty Schmarranty
- Windows 7 Telnet Client
Export Dreamweaver CS4 Site Info
July 7, 2009 by Robert Owen
Filed under Web Design
Ninety-nine percent of the time I work on websites for myself and others from the comfort of my home office. I can kick back relax and generally get a lot of work done. Sometimes, however, I need a “Change of local”… The office gets a little confining. Instead of copying the site (or sites) I’m working on from desktop to thumb-drive to laptop, I have devised another method.
This may not be the “best” method but, it works quite well for me. (Thank you very much
)
First, I make use of a free Program/Utility from Microsoft called Live Mesh. This utility lets me keep files and folders synchronized between computers regardless of where they are located. I set up my working directory to be synchronized to my storage space in the Live Mesh and my Laptop. Second, I use the “Export” command in Dreamweaver to copy my sites settings to an XML file. I save those files in a folder that is also synchronized to my laptop. Then I just import them back in when I am working on the laptop. (I would recommend that you export your site settings regularly so that you have a backup copy if anything happens to the site.)
How do you export the site information in Dreamweaver CS4?? It’s super simple! Here’s what you do:
- Open Dreamweaver CS4.
- Select Site —> Manage sites.
- Select one or more sites whose settings you want to export and click Export:
* To select more than one site, Control-click (Windows) or Command-click (Macintosh) each site.
* To select a range of sites, Shift-click the first and last site in the range. - If you want to back up your site settings, select the first option in the Exporting Site dialog box and click OK. Dreamweaver saves remote server login information, such as the user name and password, as well as local path information.
- If you want to share your settings with other users, select the second option in the Exporting Site dialog box and click OK. (Dreamweaver does not save information that would not work for other users, such as your remote server login information and local paths.)
- For each site whose settings you want to export, browse to a location where you want to save the site and click Save. (Dreamweaver saves each site’s settings as an XML file, with an .ste file extension.)
- Click Done.
See? Super Easy! Now all you have to do is import them back into your other installation of Dreamweaver. Here’s how you import it all back into the program:
- Open Dreamweaver CS4.
- Select Site —> Manage sites.
- Click Import.
- Browse to the folder where you saved the exported sites and select one or more sites. Remember, these sites are saved within files with an .ste file extension.
* To select more than one site, Control-click (Windows) or Command-click (Macintosh) each .ste file.
* To select a range of sites, Shift-click the first and last file in the range. - Click Open and then click Done.
- After Dreamweaver imports the site settings, the site names appear in the Manage Sites dialog box.
Possibly Related Posts:
- Set-up an FTP Server on Windows 2003 Server
- CSS – Long URL
- WordPress and Smileys
- Hugged your Developer today?
- Windows 2003 Server does not stream FLV videos
Pre-Order Windows 7 upgrade and save 50%
June 25, 2009 by Robert Owen
Filed under MicroSoft, Software
I was wandering around the web this morning and saw an Article over at ZDNet about Windows 7 prices.. Which led me to this other link to a Microsoft Pre-Order Windows 7 page. And, looky here!! Starting tomorrow, June 26, you can pre-order upgrade versions of Windows 7 at 50% off!!!
Here’s a blurb from the page:
It’s pretty simple
Windows 7 is coming on October 22, 2009. Here’s an easy way to get it fast and save a bundle: Pre-order a Windows 7 Home Premium Upgrade for $49** or a Windows 7 Professional Upgrade for $99.** That’s about half off the estimated retail prices. This offer is available through participating retailers. Pick one below and pre-order today. They’ll tell you how to get your copy when Windows 7 is available.
Then sit back and smile. You scored.
I’ve been pretty happy with Vista but, decided to give Windows 7 a try. So I installed the Release Candidate on my laptop a while back and have to say I think it’s the best Microsoft OS to date! So, if you are unhappy with the performance of Vista then I would take this opportunity to upgrade at a great price!! Just goto the Windows 7 Pre-Order page starting tomorrow to SAVE!
Possibly Related Posts:
- Create a Shortcut to open in your Alternate Browser
- My Latest Upgrade
- Windows 7 Telnet Client
- Windows 7 error 86
- Windows 7 Clean Install from Upgrade
New Zune HD Video
June 25, 2009 by Robert Owen
Filed under Gadgets, Zune
We’ve got a new “Hands-on” video with the new (soon to be released) Zune HD. Here’s a quick reminder of what we know (or think we know) so far about the Zune HD.
- The Zune HD will ship on September 5, 2009.
- Organic light-emitting diode (OLED) touch screen.
16:9 widescreen format display (480 x 272 resolution) - High-definition (HD) video output capabilities.
- Built-in HD Radio receiver.
- Wi-Fi. “Zune HD is Wi-Fi enabled, allowing for instant streaming to the device from the more than 5 million-track Zune music store.”
- Internet browser. “Zune HD will include a full-screen Internet browser optimized for multitouch functionality.”
- 16GB and 32GB, Microsoft is considering adding a 64GB Zune later on in the model year.
- Price rumored for the 16GB will be somewhere in the range of $249 -$280
- New Version of the Zune Software… Zune 4.0
Video via Engadget
Video via Engadget
There is also a good Interview with the Zune source over at Neowin.net check it out!
Possibly Related Posts:
- Another Zune HD Hands-On Video
- Pre-Order your ZuneHD!
- Cool Video: Bird Attacks RC Plane
- Zune HD Video!
- Blackberry Going the way of the iPhone, Kinda.
Load DLL’s needed for Kernel – XP
June 11, 2009 by Robert Owen
Filed under MicroSoft, PC-Care, Support
Had a user call reporting their computer shutting off suddenly. On reboot, they received the message “On last operation CPU reported a thermal event” Well.. This told me that the CPU fan had probably choked and the CPU had overheated causing the PC shut down. Upon inspection I found my initial thought was only partially correct.
The CPU had overheated, that was obvious, because the heat sync below the fan was completely clogged with dust… or a small feline, I’m not sure which. BUT, The fan was still working. Everyone should now take a look at the blog entry I made on cleaning your PC.
Now, what does that have to do with the DLL title? Well, it appears that one of the times the PC shut down on them, Windows was making use of some system files and they were corrupted or deleted. This caused the error:
“Windows unable to start, Load DLL’s needed for Kernel” this effectively halts boot-up. No chance for safe mode… Nothing. According to Microsoft he only solution at this point was to do an “In place” reinstall of Windows XP. This is a pain in the … but things could be worse. I’ve recently found another soultion that may or may not work for you but here it is.
Boot your system from the Windows XP CD and choose to repair your system via the Recovery Console.
Once in the Recovery console select your installation of windows and follow these following steps:
- type: “CHKDSK /f/r” – this will take a long time but should fix the file system errors on the disk.
- type: “BOOTCFG /rebuild” – This rebuilds your boot configuration.
- type: “FIXBOOT” – fixes the boot sector.
- type: “FIXMBR” – Fixes master boot record.
- and lastly type: “EXIT” – This exits the recovery console and reboots your computer.
I’ve not had an opportunity to test this second option for myself but, it looks like it should work well. The chkdsk takes a while to so it’s not much of a time saver or the “In-Place” reinstall. But it might save you some grief should your installed programs get removed from the refreshed registry.
So.. In short… Take the time and check out the state of your PC.. Or have someone do it for you. It could save you A LOT of grief.
Possibly Related Posts:
- Create a Shortcut to open in your Alternate Browser
- My Latest Upgrade
- Scammers: They really need to try something new
- Warranty Schmarranty
- Windows 7 Telnet Client

