My Latest Upgrade

May 5, 2010 by Robert Owen  
Filed under MicroSoft, Windows 7

Windows 7 …. Bacon Edition!

Coming to a Frying Pan near You!  You know you want it! :-)


Possibly Related Posts:


Windows 7 Telnet Client

December 7, 2009 by Robert Owen  
Filed under MicroSoft, Windows 7

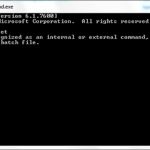
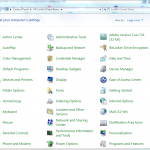
I dropped to a command prompt today on my Windows 7 machine to telnet into my Cisco Router and found, that once Again the Microsoft telnet client is not installed.

telnet-1

It seems that, as with Windows vista, the Microsoft Telnet client is not installed by default.   But luckily it’s pretty easy to install,  just follow these simple steps:

  1. Click the Start “Pearl” and select the Control Panel from the menu.
    telnet-2
  2. Once the Control Panel opens, double click the Programs and Features  applet.
    telnet-3
  3. A new window will open. Select “Turn Windows Features on or off” from the left menu.
    telnet-4
  4. Again, a new window will open. Check the box beside “Telnet Client” … Also, if you want to enable your “Telnet Server” or “TFTP Client” you can select them at this time also. Click Ok after you have finished your selections.
    telnet-5
  5. Windows will not prompt you that it is installing the components.
    telnet-6

After if completes you will be able to make use of the Windows Telnet client.
telnet-7


Enjoy!

Possibly Related Posts:


Windows 7 error 86

October 28, 2009 by Robert Owen  
Filed under MicroSoft, Support, Windows 7

Windows 7 & Windows 2000  -  Error 86 when mapping drives.

One of my upgrades this week to Windows 7 was from a Windows XP laptop. Following  the steps I outlined in my previous post the initial process was a breeze!  No problems at all!!  Simple, some would say,  and as everything else goes as soon as “they” said it was simple…  Something will break!  That’s just how it is… If something seems easy, it will be easy!  Until you TELL someone it was easy, then all bets are off!

In this instance the thing that broke for me was some basic drive mapping…  This person  had a Windows 2000 machine still in use.  Lots of hard drive space shared,  printers shared… etc, etc.  Well, when this laptop was upgraded to Windows 7,  every attempt at mapping the shared drives would end in a “username & password error”.   Knowing that I was using the correct username and passwords (I had reset them a couple of times) I attempted to map the drives via the command line and that is where I saw another error.

ERROR 86 (network password incorrect)… hmm same problem only now it’s slightly better because I had an error number, Google, and Bing.  And, having those three things,  you can find the answer to anything. 8-)

Here’s what fixed the issue for my situation:

To solve this I needed to edit a Local Security Policy and set one of the entries to something other than “Not Defined” as it is on default.

First, enter the control panel, and in the top right, under ‘View by’ select ‘Large Icons’.  7-ctrl-panel

Then choose ‘Administrative Tools’, and then select ‘Local Security Policy.’

7-ctrl-2

A new window will appear and then choose ‘Local Policy’ on the left, then ‘Security Options’.

7-ctrl-3a

There will now be a large list of choices appear in the right window.  Scroll down and double click  Network Security: LAN Manager authentication level

A new window will oen. From the drop down menu select  Send LM & NTLM responses.  Then click the Apply button.

7-ctrl-4

Once I performed these steps,  I was able to map all  shared drives and Shared Printers on the Windows 2000 PC.

Possibly Related Posts:


Windows 7 Clean Install from Upgrade

October 28, 2009 by Robert Owen  
Filed under MicroSoft, Support, Windows 7

win7logoWindows 7 seems to be a hit!
Since it’s release on October 22, I’ve installed it in one form or another MANY, times probably twelve in the last 6 days.   The first couple of upgrades concerned me slightly because of the indefinite answer on whether or not you could do a clean install from the upgrade disk.

I had a couple of laptops running the release candidate and I DID NOT want to have to install Vista then do an upgrade.  But to my surprise that was just as easy as the install from an OEM disk.  It’s was “quick-ish” and really simple.  Here’s how I did it each time and it worked like a charm.

  1. Back-up all your files and settings. (I used the Windows Easy Transfer Utility)
  2. Insert the upgrade DVD into the drive and reboot the computer.  Booting to the DVD of course.
  3. Once the DVD loads you will see a menu to select “Upgrade” or “Custom Installation”
  4. I chose Custom. Selected the drive I wanted to install to.
  5. Clicked “Advanced” for that drive then chose format. You’ll get the usual warning saying all files will be deleted… blah blah.
  6. Select the newly formatted drive and install away.
  7. Once in windows you enter the Key and activate. Simple.

Once in windows,  go into the Windows Transfer Utility and import all of your saved files and settings.  Install any needed programs and Updates then you should be good to go.

I’ve seen where other people have had to do some Registry Hacks to get Windows to take the Upgrade key after this type of installation but, I did not have that issue during any of my upgrades.  If you should get an error entering your key saying that it is not valid for that type of install check out these directions over at the Supersite for Windows.

Possibly Related Posts: